pages

Showing posts with label easy. Show all posts

Tuesday, January 17, 2012

I have a confession to make....

From the City...

I love my phone.  I love the camera, the apps, the calendar, the games ( scrabble addict right here),  I love its cute sleek little design and I won't even lie, if I forget it at home, I'm lost.  With this cold weather this little phone of mine gets a little glitchy and sad so I decided to whip up a little sock for it.  
Here's some pics: 
 
Its a pretty straightforward project.

Measure 8 cm across.  I doubled it up with some ugly grey to make it warmer.

Cut a strip of fun fabric and stitch it to the front, making sure to leave enough to curl over for when you sew the whole thing together.

Sew all the way.  Then if you desire and you like the look, hand stitch with embroidery floss around the edges.  I also did this to the button whole to make it a little more secure as felt has a tendency to stretch and fray.

Find a cute button, like this one from Bread and Buttons, which was given to me by my sister!

I glued it down as well as stitched it because I really didn't want to lose it.

Insert phone and enjoy!

Friday, December 16, 2011

Crafting from the Farm- Clay Ornaments

From the country...
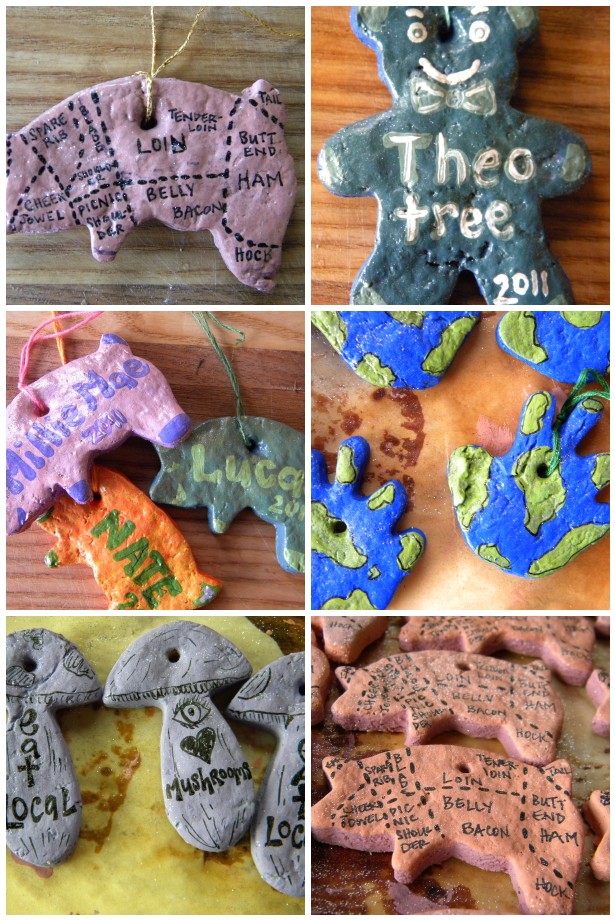
naked decorations, awaiting the oven...

I had hoped that December would be a relaxing month where I could make crafts, knit, bake and nest.

Not so much.

I think I need to realize that there will be no real relaxing month, maybe just a few relaxing hours per day. Between market, closing down the farm (on going), the kids and our livestock, December has been a rather hectic month for us. We have had turkey fatalities, a crawling little lady into EVERYTHING and a particularly trying time with the boys (no Santa threat seems to work...).

Theo T's slightly scary bear ornament...

January may be the month I am waiting for perhaps?

Anyway, I have managed to set aside a few minutes per day to work on clay ornaments. I have made some mementos for the kiddies to put on the tree and they have made their own creations. I have also been to the public school for my annual craft with the Kindergarten class.


So here are some photos of said clay ornaments, this years addition to the tree and some to sell at market this weekend.

Now if I could only get around to that baking...

Saturday, December 10, 2011

From One Blogger to Another

From the City...(Little Dude, just shy of 9months)
So I've recently discovered some free online photo editing sites that are amazing!!! 
Super easy and straightforward, even for the most non techy folks, myself included.  Seeing as I discovered it from a blog I follow, it only seemed fair and fitting that I should pass it along, you know, good blog karma and all.

So here's the scoop.  You do need to register for both but its a very fast and straightforward.  Worth it.  

Picnik: The free package gives you the basic goods.  Basic pic editing, collage maker, different filters, writing on pics, rounded edges etc.  The catch is, with the basic, you get very limited collage making options.  Max, like 6 pics or something.  So then you take your edited pics and you head over here.

Big Huge Labs: Again you have to register.  You can add a max of 36 pics to this collage maker, you can do a basic layout, or a much more exciting one with larger pics and smaller pics combined.  It's so easy and straightforward, you don't have to resize pics or crop or anything, they just work everytime.  It's the best.  

So anyway, there it is.  

Hope it makes your projects more fun!
-ab

**Note: I do not work for the companies suggested, I was not compensated for telling you this.  
This is strictly my new addiction and I wanted to share it.    

Thursday, December 1, 2011

Chocolate Beet Root Cake


From the country...

I don't dislike beets. I tolerate beets when need be. There are very few vegetables that I dislike. Beets are just on the bottom of the list.

When I bake a chocolate cake it has to have all the good old fattening stuff like butter, buttermilk, eggs...but when Mark's birthday rolled around he requested a chocolate beet cake.

Beets in a cake? I tried to talk him out of it. He insisted that this baked delight was all the rage, so the cake was made.

It wasn't bad. It was really moist (having 6 beets in it), the cream cheese icing was amazing and simple to make. It had a beety earthiness but it wasn't over powering. Would I trade in my go-to chocolate cake recipe?

Uh, no.

But we did have an extra serving of vegetables with our meal.

Monday, November 28, 2011

Baking Bread and then Breaking Bread

From the City...
 A tiny kitchen that is, amazingly, still big enough for bread making.  Note the pink kitchen aid which did all the bread making dirty work.  And yes, that is an apron with naked cowboys on it.    
 The dough.  Before it's first rising.  One of the best tips in this recipe is to make sure that your yeast, sugar and water mixture is good and frothy before you add the flour to it.  
 I turned my oven for 20 seconds at about 350 degrees and then turned the oven off and stuck the dough in for about an hour and voila, it came out like this.  At least doubled in size.
 Divided into two loaves and put back in the oven for another 30 minutes to rise again.  This pic is after the second rising.  Egg wash and sprinkled with sesame seeds.  
Baked for 30 minutes at 350 degrees.  
For dinner we had slabs of bread with raspberry jam and farm eggs with goat cheese, 
it was like my dream evening.  

It's really great and super foolproof.  

My changes are as follows (which I did the second time around):
only 2 tbsp sugar 
(I wanted sandwich bread but I would add the full amount of sugar if you plan on making raisin bread or sticky buns or something incredibly delicious like that)
2 cups whole wheat flour and 4 cups white bread flour 
(the original recipe is a bit too cakey but would be PERFECT for french toast)
I also found the loaves way too big.  
For a special occasion, sure, have the extra large slabs but on a day to day, we like our bread regular sized and toaster friendly, because of this, I made three loaves as opposed to two. 
Cheat, use your kitchen aid. 
Proof your yeast, water and sugar in the bowl of your mixer.  Add your oil and salt and mix, with the dough hook, on low for a couple of minutes.  Then add your flour a cup at a time.  Crank it up to medium and let it knead for 5 minutes.  

happy breadmaking!
-ab

Thursday, November 17, 2011

Pickled Carrots

From the country...

I am nearing the last of the preserving, I just have a crock of sauerkraut to make and some jam for the holidays. I LOVE pickled carrots not only do they taste amazing but they look like glowing embers in a jar. This batch resulted in 5 jars, so I may have to make another batch to last the winter. I went with this recipe (from the lovely people over at Well Preserved) for the brine but each jar had a slight variation of seasonings. Two jars were spicy with chili flakes, another was celery seed/red peppercorn, one jar of cumin/red peppercorn, and the last was spiced up with fenugreek. And of course each jar had some sliced onions, one or two garlic cloves and a bay leaf. Fennel seed would also be a great addition.. really the sky is the limit.

I have yet to put these beauties on their shelf in the pantry because I am not done gazing at them as the shine on the counter in the day. They really reflect what little sun light we have now that the days are oh so short....

Sunday, November 13, 2011

Creamy Tomato Soup

From the City...

Any recipe that comes together with only the things that you have on hand, whether in your pantry or in your freezer, is definitely a friend of mine.  

 Tomatoes, onions, and garlic.  Before.
 Tomatoes, onions and garlic roasted.  After. 
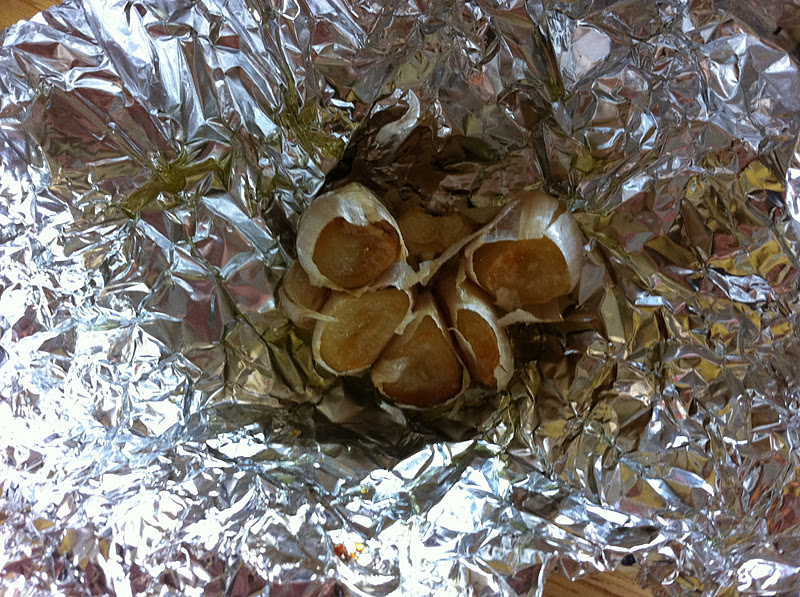
 A close up of that roasted garlic.  Olive oil and tinfoil.  That's it.  
 Completion/Perfection.

1 can whole tomatoes
2 onions
1 large head local garlic
stock or water
a handful of freezer basil
salt /pepper to taste
olive oil 
a splash of cream (1/4Cup)

Roast tomatoes, onion and garlic with a little olive oil and salt and pepper for about 25 minutes at 350 degrees.

Once finished, heat a splash of olive oil in a pot, toss in onions and garlic and then the tomatoes and basil.  Thin with water or stock as much as desired. Add basil. 

Remove from heat and puree.  Put back on the heat and add your cream and salt and pepper to taste.  

If you feel so ambitious, you can put it through a strainer to thin it out even more but I like a little texture so I kept it just the way it was.  
Every cold rainy Sunday should be spent with these three, plus loads of blankets, toys, books and of course, tomato soup.

Happy Sunday Everyone!

-ab

Wednesday, November 9, 2011

*RECIPE: Thai Green Curry

From the City...
My empty plate.  Would have looked a lot better with the actual curry in the picture.

When Simon and I traveled in Thailand, I ate more green curry than you can shake a stick at (not sure what that saying means but I'm pretty sure it means, a lot.)  We also took a cooking class and learned to make our own with the goods from the market.  
I was able to dig up some of our pics from that trip, hello 2009. 
 Restaurant on Koh Chang, Green Curry.  
And yes, I did eat everything in the giant bowl and no it is not a platter.  
 Simon with a lot more hair.  Cooking class in Chiang Mai.  Siam Rice.
 Assortment of Goodies.
Cooking Class Green Curry.

David Lebovitz posted the most delicious recipe over on his blog along with some truly beautiful pictures to accompany it.  You can find his recipe here.  This recipe is for sure a keeper.  I didn't have shrimp paste so I used tofu instead and I was pretty happy with it.

-ab

p.s I just love those damn tiny corns.

Thursday, November 3, 2011

Felt Flowers

From the City...
I think it's fair to say that if I could only take two things with me to a deserted island, it would be loads of colourful felt and a hot glue gun.  My pen pals birthday just passed and so I made her a poppy broach to wear.  I just love poppies and it just so happens that her birthday falls near Remembrance day so it just seemed to fit. 
Here is the inspiration that I used for this flower.  It's also a pretty great blog that you should check out.

Stitch the veins on the leaves
Stitch leaves to black backing
Stitch clip to other side of black backing
Glue button to middle.  Glue black backing with green leaves attached to red poppy.

Stick it in the mail and send it away.

-ab

Sunday, October 16, 2011

One Can Never Have Enough Aprons

From the City...

Here's some pics from my apron making session the other day.  This one is actually a gift but I will not lie to you, I have a definite soft spot for aprons and not just for decoration, I wear them pretty much every time I cook.  This one I made out of an old vintage sheet I found at the salvation army.  
 I first cut out just a big U shape.  Nothing fancy here.  I really hope no seamstresses are reading this because they will shake their heads at my sloppy sewing skills.  I apologize in advance.  
 I then cut out a large belt out of a different fabric for the top of the apron and cut two strips for the rest of the belt. 
Attached 'em.  Make sure to sew them pattern side to pattern side.  Trust me.   
 Attach a pocket if you so desire.  This, I won't lie, is merely for appearance.  I mean, how often do you need to put something in your pocket when you're cooking?  

 Sew the whole thing together like mad.
 Voila.
Oh and here's the sweater that turned into a shawl that turned into a cowl.  Turns out cowl's are so hot right now and I was so damn sick of knitting this thing that I just needed to end it. 

Happy Sunday Everyone.
-ab 

Sunday, August 21, 2011

Oven roasted cherry tomatoes...

From the country...
Oven roasted heaven...

Slice cherry tomatoes in half toss with olive oil and some sea salt and oven roast on low for 3-4 hours. While waiting for them your kitchen will smell like some kind of tomato heaven. It is so worth the wait! They will be great on pizza, in a fresh pasta or just off the cookie sheet.

Friday, August 5, 2011

CookBook Review

From the City...
So, I was gifted Ellie Krieger's, The Food You Crave, cookbook from work last year and I have finally gotten a chance to cook from it.  I am such a creature of habit and I get stuck in ruts where we eat the same thing week after week, so being on mat leave, I considered this an ideal opportunity to dive into it and try some new recipes.  

I made the sage and garlic rubbed pork chops, turkey meat loaf, fish tacos with chipotle cream and the noodles with lime- peanut sauce.  I can confidently say, I would remake each and everyone of these recipes.  Simon and I were both super impressed.  The good thing about the cookbook, for me anyway, was that the ingredients were things that I had on hand, nothing was too obscure and hard to find.  The recipes were also incredibly easy and straightforward and made with good whole fresh ingredients, which I love.  


 Here is the meatloaf recipe, which you can also find on her website so I don't think its wrong that I'm sharing it with you.  I think the trick to this recipe is that you add oats that have been soaked in milk.  This makes the the final product nice and moist.  It's really really really very good.  Here's a link to more of her recipes that she makes available.


Mom’s Turkey Meatloaf
3/4 cup quick-cooking oats
1/2 cup nonfat milk
1 medium onion, peeled
2 pounds ground turkey breast
1/2 cup seeded and chopped red bell pepper (1/2 medium pepper)
2 large eggs, beaten
2 teaspoons Worcestershire sauce
1/4 cup ketchup
1/2 teaspoon salt
Freshly ground black pepper
One 8-ounce can no-salt-added tomato sauce

Preheat the oven to 350°F. In a small bowl, stir together the oats and milk and allow to soak while you get the rest of the ingredients together, at least 3 minutes. Thinly slice one-quarter of the onion into rings and set aside. Finely chop the rest of the onion. In a large bowl, combine the turkey, oatmeal mixture, chopped onion, bell pepper, eggs, Worcestershire, ketchup, salt, and a few grinds of pepper. Mix just until well combined.

Transfer the mixture to a 9 x 13-inch baking dish and shape into a loaf about 5 inches wide and 2 inches high. Pour the tomato sauce over the meatloaf and sprinkle with the sliced onions. Bake until an instant-read meat thermometer inserted into the thickest part registers 160°F, about 1 hour. Remove from the oven and let rest for 10 to 15 minutes before slicing.

Makes 8 servings

***note: I do find her serving sizes are a bit small.  Her noodle dish was supposed to feed six but S and I plowed through in one sitting with a little left for lunch for the next day.  Maybe we just have a problem though.

Anyone out there have any other good cookbook recommendations they want to share?

ab

Wednesday, July 13, 2011

Pickled Garlic Scapes

From the country...


It is that time of year again when we fire up the ol' canner once a week and start putting up our winter stash of goodies. This process always starts with countless jars of rhubarb and of course garlic scapes.

Here is a brine recipe that you can apply to almost everything (it is a recipe for pickled beans that we use for everything). I like brines that are cut with water to soften the vinegar kick.

4lbs garlic scapes whole with the ends cut off
1-2 teaspoon of whatever seasonings you have (pepper flakes, whole mustard seeds, dill seeds, bay leaf, -whatever you prefer, play around with different spices!)per jar
5 cups vinegar
5 cups water
1/2 cup salt

Wash up the scapes. Pack them in the clean jars by twisting and shoving the scapes into the jars (a gentle shove that is...). Add your seasonings. Pour the boiling brine over the scapes, filling the jars but leaving a 1/4 inch head space. Seal and process in a hot water bath for 5 minutes.

Now the real trick here is to put them away out of reach and let the pickles "come together" before you devour the suckers. The longer they rest and get "pickley" the better they taste.

Tuesday, July 5, 2011

Chicken Butchery 101

From the City...

One of the most economical ways to buy organic chicken is to buy it whole and butcher it up yourself, it's also a very good life lesson that everyone should learn (this is almost a direct quote from my brother in law Mark and damn-it if the bugger wasn't right). This chicken cost me $11 and made three meals. Barbeque chicken on Monday night, chicken salad sandwiches on Tuesday for lunch and chicken soup for dins that night.

It really didn't take long either. The whole process of cutting the chicken took me maybe 15 minutes tops. So you can't really use that as an excuse. A whole chicken is going to take a good hour (at least ) to cook but cut up, it took me only 20 minutes on the bbq. Not too bad, not too bad at all.

Here are some pics on the process and yes, I did get chicken guts on my camera and have to wash it.
Slice down the one side of the breast bone.
Crack open and place your knife down the spine starting at the legs.

Voila, one chicken, two halves ready for the bbq.
Bowl o' chicken ready for cooking. I took the skin off but don't tell Mark, he'll think its sacrilege.

Here's a video that'll help you out.

**yes, I do realize the above pic is of a rooster Laura. Thank you for noticing.
Pin It "> Related Posts with Thumbnails Pin It